> ## Documentation Index
> Fetch the complete documentation index at: https://sol.advantagelearn.com/llms.txt
> Use this file to discover all available pages before exploring further.
# Laravel
# Laravel
## Fix "504 Gateway Timeout" When Using Laravel Valet
Created: December 1, 2020 2:53 PM
Tags: Dev, General
If you get a **504 Gateway Timeout**
when using Laravel Valet and you want to increate the timeout, you can
do this by modifying the file /usr/local/etc/nginx/valet/valet.conf:
```
vim /usr/local/etc/nginx/valet/valet.conf
```
Now, add these lines:
```
proxy_connect_timeout 600;
proxy_send_timeout 600;
proxy_read_timeout 600;
send_timeout 600;
fastcgi_read_timeout 300;
fastcgi_buffers 8 128k;
fastcgi_buffer_size 256k;
```
To this block:
```
location ~ [^/]\.php(/|$) {
fastcgi_split_path_info ^(.+\.php)(/.+)$;
fastcgi_pass "unix:/Users/sebastian/.config/valet/valet.sock";
fastcgi_index "/Users/sebastian/.composer/vendor/laravel/valet/server.php";
include fastcgi_params;
fastcgi_param SCRIPT_FILENAME "/Users/sebastian/.composer/vendor/laravel/valet/server.php";
fastcgi_param PATH_INFO $fastcgi_path_info;
# ENTER HERE
}
```
After saving the file, restart Laravel Valet:
```
valet restart
```
Now, the required timeouts should be increased.
## Migrating from Valet to Laravel Sail
### Setting up Laravel Sail
#### Step 1: Installing Docker
Before you can run Laravel Sail, you will need a local Docker setup. On MacOS, it seems like it is simply a [case of
downloading and installing Docker Desktop](https://docs.docker.com/docker-for-mac/install/)
#### Step 2: Building docker container
Before anything will work, you need to build the docker containers as specified in `docker-compose.yml`. To do so, run
`vendor/bin/sail build` from inside the Delta LMS directory. This command will take a while to run.
Once done, you can set the app live by running `vendor/bin/sail up`
#### Step 3: ENV changes
If you tried to access the site now, it would fail, as your ENV file is still pointing at [localhost](http://localhost)
for most things. The following changes are required:
* APP\_URL needs to be changed to`http://localhost:8084`. The port must be the same as the one specified to forward to
80 in `docker-compose.yml`
* DB\_HOST needs to change to `mysql`, as this is the name of the default docker container for the MySQL instance.
There is another mysql container for testing purposes, named `mysql_test`. This container exists in order for us to be
able to run a separate DB when running tests
* REDIS\_HOST needs to be changed to equal `redis`. This is the name of the docker container which houses the redis
server instance.
### Setting alias for Sail
you don't set an alias for Sail, you will need to run `vendor/bin/sail` at the beginning of each command, which isn't
ideal. To set the alias you need to add the following line to your bash config file:
```bash theme={null}
alias sail='bash vendor/bin/sail'
```
The name and location of this file depends on your system. For me it was found at `~/.bashrc`
Once set, you can then use `sail`, e.g `sail artisan migrate`, `sail db:seed`, etc
### Accessing your DB via TablePlus
When accessing your databases running on Sail, you will need to make a couple changes to the config on TablePlus:
* Database host is `0.0.0.0`
* Database port is the one specified in `docker-compose.yml` for the mysql container you are accessing: 4306 for the
primary DB and 4307 for the test DB
The username and password will be the values you specified for DB\_USERNAME and DB\_PASSWORD
#### MySQL username and password
If your local setup uses `root` and no password to connect to MySQL, there are a couple extra steps required in order
to setup access to the database on docker.
You will first need to create another user and grant it full privileges to access and make changes to your
MySQL instances. [Here's a helpful guide which will assist in
doing so](https://www.digitalocean.com/community/tutorials/how-to-create-a-new-user-and-grant-permissions-in-mysql).
Once you've created the user, set your DB\_USERNAME as the username for the user you just created and set DB\_PASSWORD
as the password.
#### Errors with admin\@ip access to DB
[Reddit - laravel*sail\_mysql\_connection*
error](https://www.reddit.com/r/laravel/comments/knqjat/laravel_sail_mysql_connection_error/ghlxxc1/)
Running before migrate & seed:
```jsx theme={null}
sail up -d
```
### Running Laravel Dusk
In order to run dusk tests, you will need a new ENV file called `env.dusk.local` which needs a couple tweaks:
* APP\_URL needs to be `http://laravel.test`. For some reason this is what the automated web browser has access to,
rather than localhost:8084
* MYSQL\_HOST needs to be `mysql_test`
* TELESCOPE\_ENABLED must be false, otherwise you will get a `Class Env does not exist` error
* APP\_DEBUG must be false so that PHP debug bar doesn't pick up click events and cause issues
Once these env variables have changed, you should be able to run all dusk tests with `sail artisan dusk`.
### Documentation and guides
[Laravel 8 - Sail](https://laravel.com/docs/8.x/sail)
[Dev To - Laravel Sail Guide](https://dev.to/victoor/laravel-sail-the-best-way-to-start-developing-with-laravel-l6d)
## Set up Laravel Websockets
[Laravel Websockets](https://beyondco.de/docs/laravel-websockets/getting-started/introduction) is an open source websocket provider which allows us to show data in real-time. It requires quite a bit of setup to get working per site, which this doc will go over.
### Step 1: Open the firewall port
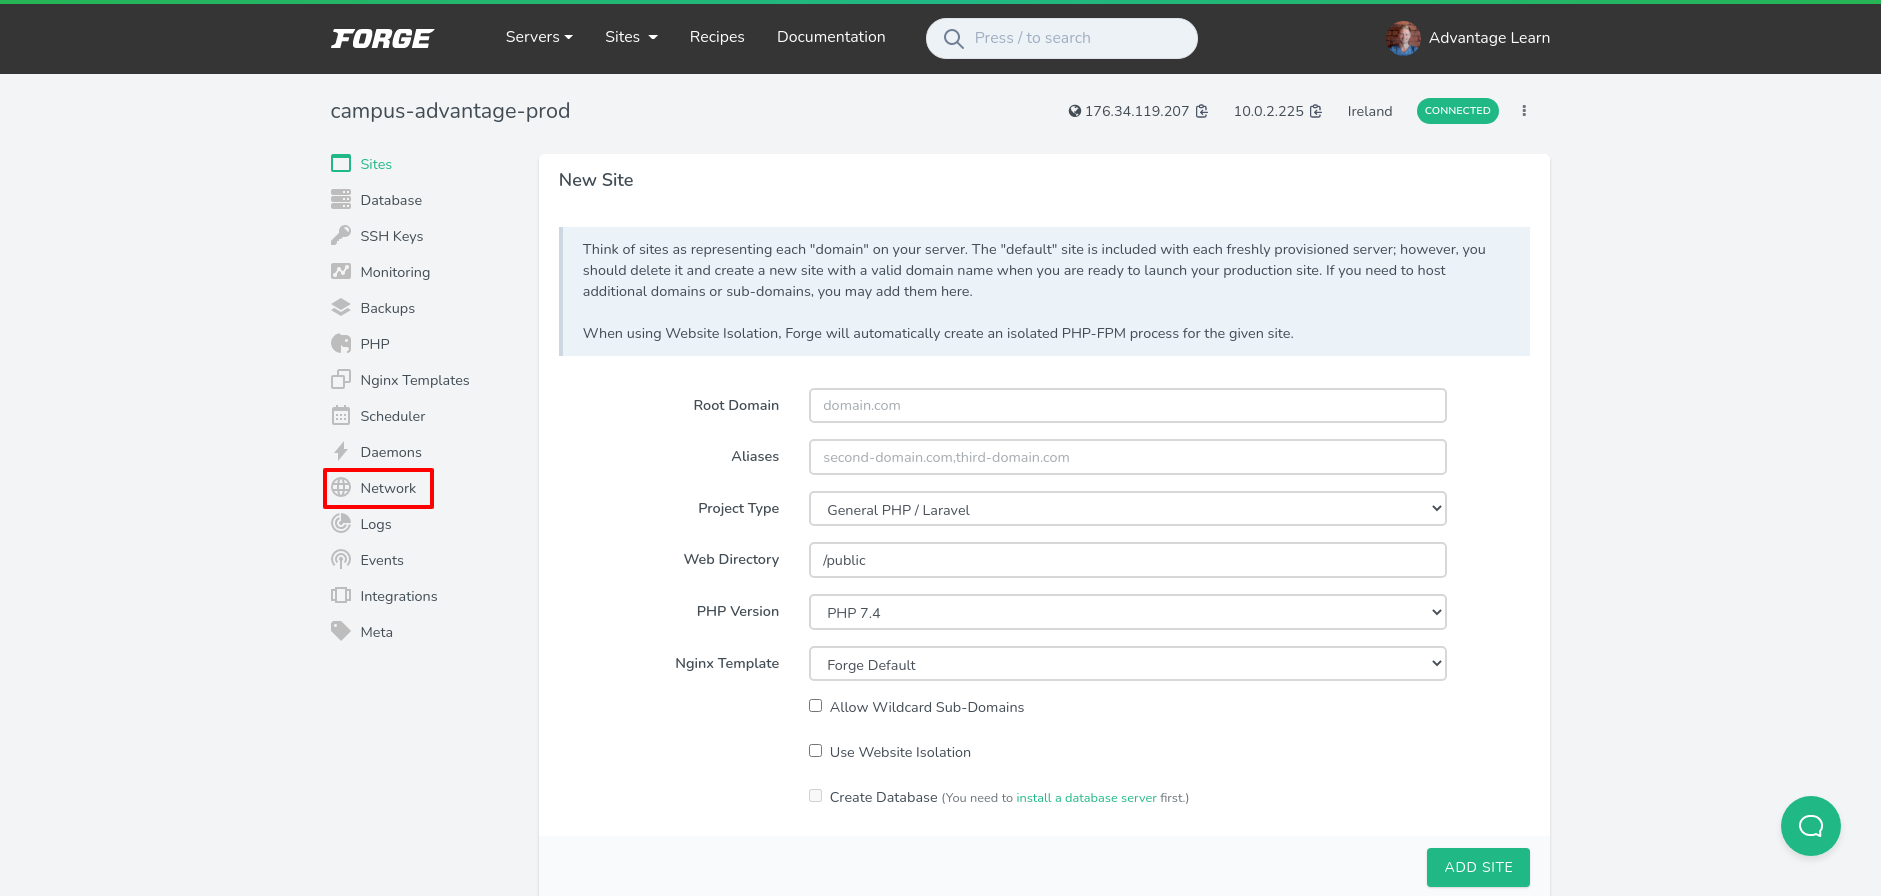
We need to open up access to port `6002` per server. Login to forge.laravel.com, select the server and then click on the 'Network' tab from the left-hand side menu:
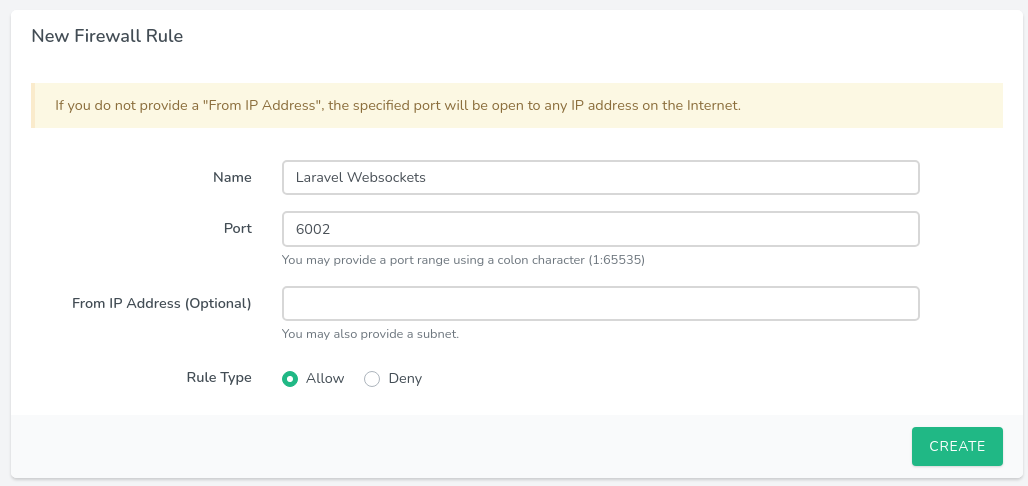
Scroll down to 'New Firewall Rule' and fill in the following details:
* **Name:** Can be anything but it should be clear this to enable the port for websockets
* **Port:** 6002
* **From IP Address:** Leave blank
* **Rule Type:** Allow
Click 'CREATE' when done.
### Step 2: Run websocket server deamon
The websocket server works similar to horizon in that it needs a deamon to keep it up constantly.
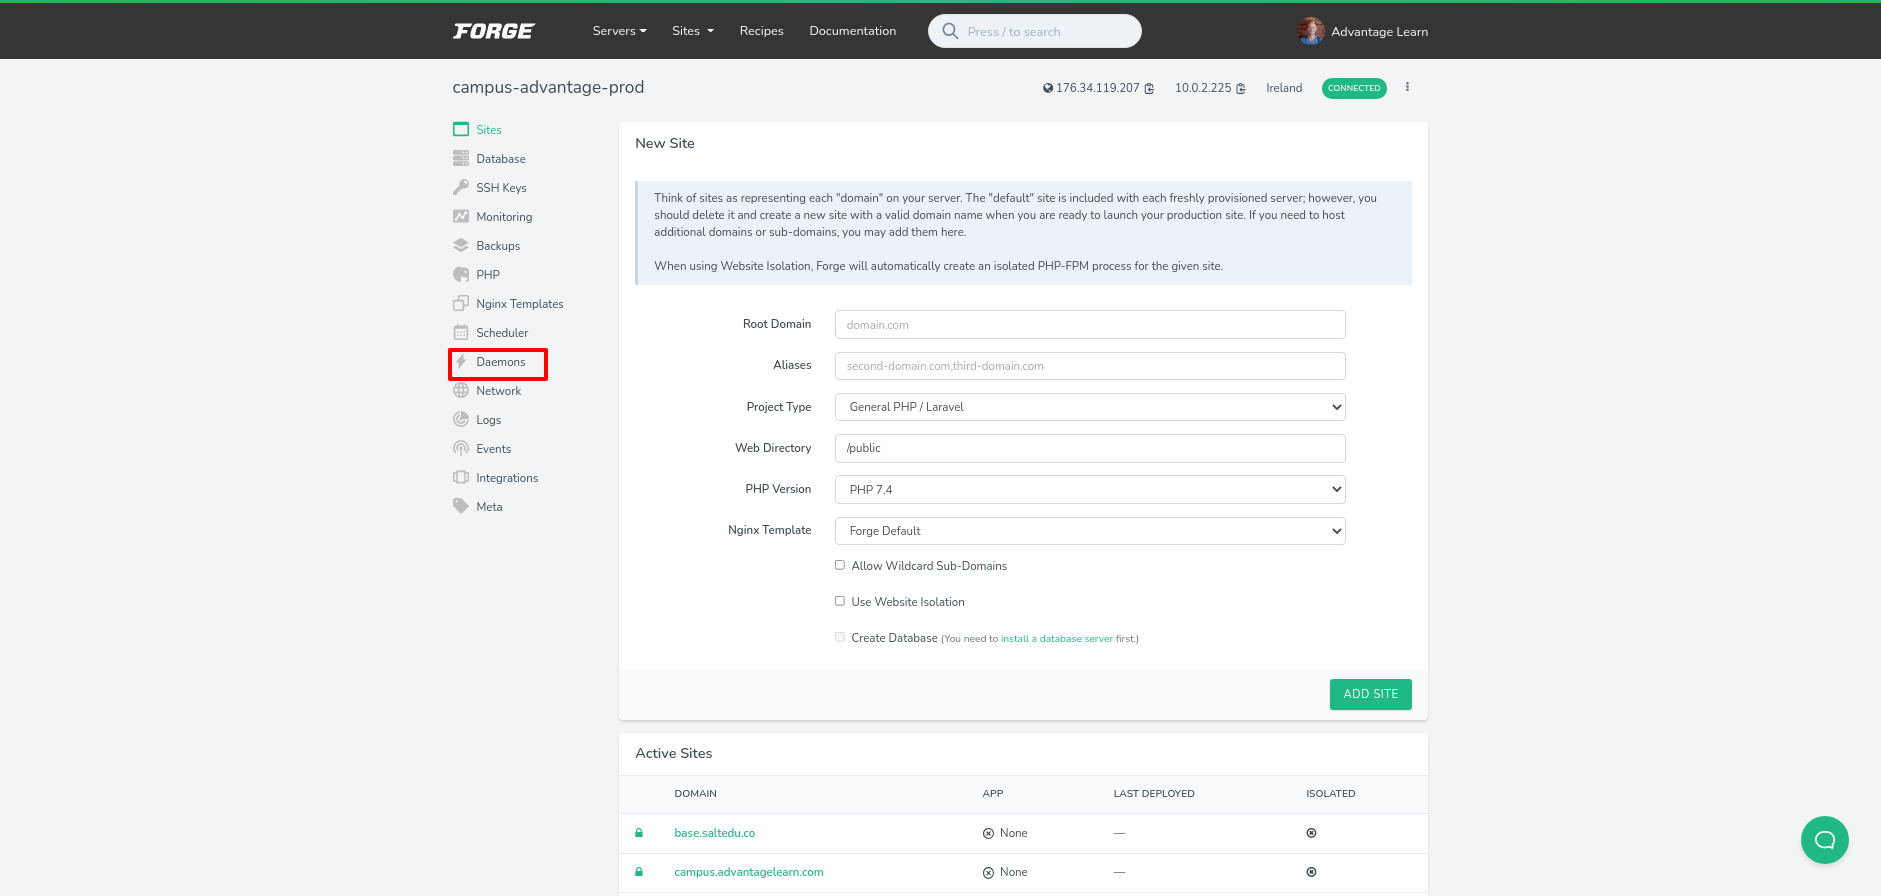
Click on 'Deamons' from the left-hand side menu:
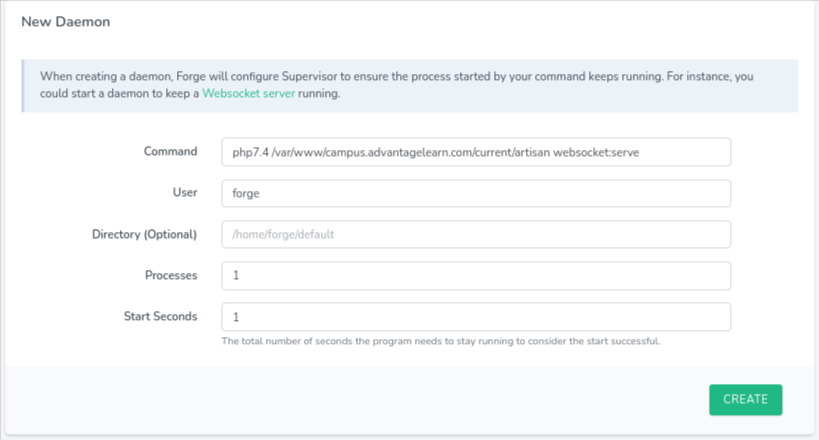
In the 'New Deamon' form, fill in the following details:
* **Command:** php7.4 /var/www/DOMAIN\_NAME/current/artisan websocket:serve
* **User**: forge
* **Directory:** Leave blank
* **Processes:** 1
* **Start Seconds:** 1
You'll need to do this for each site on the server, replacing DOMAIN\_NAME for the domain name for each one.
### Step 3: Adjust NGINX config
Each site on the server will need to have a new `server` block in the NGINX configuration allowing it to connect to the websocket server on port `6002`.
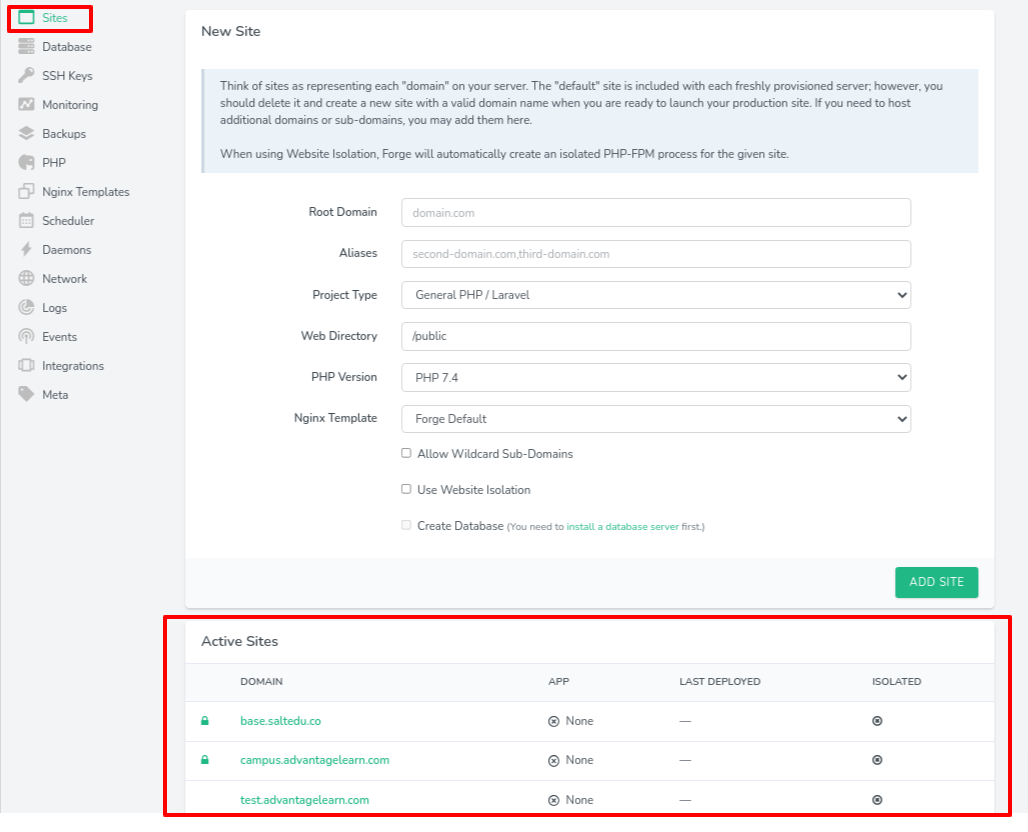
Click on 'Sites' from the left-hand side menu, then scroll down to 'Active sites' and click on the name of the site.
Look for the 'Files' button, click it and then click 'Edit Nginx configuration':
Duplicate the server block which is listening to port `443`, change all references of that port to be `6002` and then replace this block:
```bash theme={null}
location / {
try_files $uri $uri/ /index.php?$query_string;
}
```
with this:
```bash theme={null}
location / {
proxy_pass http://127.0.0.1:6001;
proxy_read_timeout 60;
proxy_connect_timeout 60;
proxy_redirect off;
# Allow the use of websockets
proxy_http_version 1.1;
proxy_set_header Upgrade $http_upgrade;
proxy_set_header Connection 'upgrade';
proxy_set_header Host $host;
proxy_cache_bypass $http_upgrade;
}
```
Hit save when done.
In full, your Nginx config will look something like this:
```bash theme={null}
# FORGE CONFIG (DO NOT REMOVE!)
include forge-conf/campus.advantagelearn.com/before/*;
server {
listen 80;
server_name campus.advantagelearn.com;
return 301 https://$host$request_uri;
}
server {
listen 443 ssl http2;
listen [::]:443 ssl http2;
server_name campus.advantagelearn.com;
server_tokens off;
root /var/www/campus.advantagelearn.com/current/public;
client_max_body_size 100M;
# FORGE SSL (DO NOT REMOVE!)
ssl_certificate /etc/nginx/ssl/campus.advantagelearn.com/877893/server.crt;
ssl_certificate_key /etc/nginx/ssl/campus.advantagelearn.com/877893/server.key;
ssl_protocols TLSv1.2;
ssl_ciphers TLS13-AES-256-GCM-SHA384:TLS13-CHACHA20-POLY1305-SHA256:TLS_AES_256_GCM_SHA384:TLS-AES-256-GCM-SHA384:TLS_CHACHA20_POLY1305_SHA256:TLS-CHACHA20-POLY1305-SHA256:ECDHE-ECDSA-AES256-GCM-SHA384:ECDHE-ECDSA-CHACHA20-POLY1305:ECDHE-ECDSA-AES256-SHA384:ECDHE-RSA-AES256-GCM-SHA384:ECDHE-RSA-CHACHA20-POLY1305:ECDHE-RSA-AES256-SHA384:ECDHE-ECDSA-AES256-SHA:ECDHE-RSA-AES256-SHA;
ssl_prefer_server_ciphers on;
ssl_dhparam /etc/nginx/dhparams.pem;
add_header X-Frame-Options "SAMEORIGIN";
add_header X-XSS-Protection "1; mode=block";
add_header X-Content-Type-Options "nosniff";
index index.html index.htm index.php;
charset utf-8;
# FORGE CONFIG (DO NOT REMOVE!)
include forge-conf/campus.advantagelearn.com/server/*;
location / {
try_files $uri $uri/ /index.php?$query_string;
}
location = /favicon.ico { access_log off; log_not_found off; }
location = /robots.txt { access_log off; log_not_found off; }
access_log off;
error_log /var/log/nginx/campus.advantagelearn.com-error.log error;
error_page 404 /index.php;
location ~ \.php$ {
fastcgi_split_path_info ^(.+\.php)(/.+)$;
fastcgi_pass unix:/var/run/php/php7.4-fpm.sock;
fastcgi_index index.php;
include fastcgi_params;
}
location ~ /\.(?!well-known).* {
deny all;
}
}
server {
listen 6002 ssl http2;
listen [::]:6002 ssl http2;
server_name campus.advantagelearn.com;
server_tokens off;
root /var/www/campus.advantagelearn.com/current/public;
# FORGE SSL (DO NOT REMOVE!)
ssl_certificate /etc/nginx/ssl/campus.advantagelearn.com/877893/server.crt;
ssl_certificate_key /etc/nginx/ssl/campus.advantagelearn.com/877893/server.key;
ssl_protocols TLSv1.2;
ssl_ciphers TLS13-AES-256-GCM-SHA384:TLS13-CHACHA20-POLY1305-SHA256:TLS_AES_256_GCM_SHA384:TLS-AES-256-GCM-SHA384:TLS_CHACHA20_POLY1305_SHA256:TLS-CHACHA20-POLY1305-SHA256:ECDHE-ECDSA-AES256-GCM-SHA384:ECDHE-ECDSA-CHACHA20-POLY1305:ECDHE-ECDSA-AES256-SHA384:ECDHE-RSA-AES256-GCM-SHA384:ECDHE-RSA-CHACHA20-POLY1305:ECDHE-RSA-AES256-SHA384:ECDHE-ECDSA-AES256-SHA:ECDHE-RSA-AES256-SHA;
ssl_prefer_server_ciphers on;
ssl_dhparam /etc/nginx/dhparams.pem;
add_header X-Frame-Options "SAMEORIGIN";
add_header X-XSS-Protection "1; mode=block";
add_header X-Content-Type-Options "nosniff";
index index.html index.htm index.php;
charset utf-8;
# FORGE CONFIG (DO NOT REMOVE!)
include forge-conf/campus.advantagelearn.com/server/*;
location / {
proxy_pass http://127.0.0.1:6001;
proxy_read_timeout 60;
proxy_connect_timeout 60;
proxy_redirect off;
# Allow the use of websockets
proxy_http_version 1.1;
proxy_set_header Upgrade $http_upgrade;
proxy_set_header Connection 'upgrade';
proxy_set_header Host $host;
proxy_cache_bypass $http_upgrade;
}
location = /favicon.ico { access_log off; log_not_found off; }
location = /robots.txt { access_log off; log_not_found off; }
access_log off;
error_log /var/log/nginx/campus.advantagelearn.com-error.log error;
error_page 404 /index.php;
location ~ \.php$ {
fastcgi_split_path_info ^(.+\.php)(/.+)$;
fastcgi_pass unix:/var/run/php/php7.4-fpm.sock;
fastcgi_index index.php;
include fastcgi_params;
}
location ~ /\.(?!well-known).* {
deny all;
}
}
# FORGE CONFIG (DO NOT REMOVE!)
include forge-conf/campus.advantagelearn.com/after/*;
```
### Step 4: Add SSL cert ENV variables
The websocket server will refuse to connect unless it has access to the Let's Encrypt certificate and key. There are two ENV variables to be added: LARAVEL\_WEBSOCKETS\_SSL\_LOCAL\_CERT and LARAVEL\_WEBSOCKETS\_SSL\_LOCAL\_PK. The path to these certs is found at `/etc/nginx/ssl/DOMAIN_NAME/SSL_CERT_ID/server.cert` and `/etc/nginx/ssl/DOMAIN_NAME/SSL_CERT_ID/server.key` respectively
[Here's a spreadsheet](https://docs.google.com/spreadsheets/d/1Pp_GgGkkgkqfQOj1_6NFEytwTl5M9DGaCxwZXgr9dkM/edit#gid=0) which has a formula for creating the env variables. All you'd need to add is the domain name and SSL cert ID, which you can get from the SSL page for each site:
Once you have the variables, do the following:
1. Log into envoyer.io
2. Find the project for each site
3. Click on the 'Server' tab
4. Click on 'manage environment
5. Enter the server management password
6. Add the variables at the bottom of the ENV variable and save
### Troubleshooting
You can access the Laravel Websocket dashboard on any site by going to `/laravel-websockets`. Choose 6002 as the port and hit connect. If it connects, all should be fine 🎉
Unfortunately it won't show actual statistics as the reverse proxy from nginx messes with that process.
Laravel websockets is great in that it allows us access to realtime data without cost, but it is extremely finnicky and not well documented. If it breaks, you won't really have any indication as to why. Nevertheless, [here is the troubleshooting page](https://beyondco.de/docs/laravel-websockets/getting-started/questions-issues). If that doesn't help, good luck going down the stack overflow rabbit hole!
 Scroll down to 'New Firewall Rule' and fill in the following details:
* **Name:** Can be anything but it should be clear this to enable the port for websockets
* **Port:** 6002
* **From IP Address:** Leave blank
* **Rule Type:** Allow
Scroll down to 'New Firewall Rule' and fill in the following details:
* **Name:** Can be anything but it should be clear this to enable the port for websockets
* **Port:** 6002
* **From IP Address:** Leave blank
* **Rule Type:** Allow
 Click 'CREATE' when done.
### Step 2: Run websocket server deamon
The websocket server works similar to horizon in that it needs a deamon to keep it up constantly.
Click on 'Deamons' from the left-hand side menu:
Click 'CREATE' when done.
### Step 2: Run websocket server deamon
The websocket server works similar to horizon in that it needs a deamon to keep it up constantly.
Click on 'Deamons' from the left-hand side menu:
 In the 'New Deamon' form, fill in the following details:
* **Command:** php7.4 /var/www/DOMAIN\_NAME/current/artisan websocket:serve
* **User**: forge
* **Directory:** Leave blank
* **Processes:** 1
* **Start Seconds:** 1
In the 'New Deamon' form, fill in the following details:
* **Command:** php7.4 /var/www/DOMAIN\_NAME/current/artisan websocket:serve
* **User**: forge
* **Directory:** Leave blank
* **Processes:** 1
* **Start Seconds:** 1
 You'll need to do this for each site on the server, replacing DOMAIN\_NAME for the domain name for each one.
### Step 3: Adjust NGINX config
Each site on the server will need to have a new `server` block in the NGINX configuration allowing it to connect to the websocket server on port `6002`.
Click on 'Sites' from the left-hand side menu, then scroll down to 'Active sites' and click on the name of the site.
You'll need to do this for each site on the server, replacing DOMAIN\_NAME for the domain name for each one.
### Step 3: Adjust NGINX config
Each site on the server will need to have a new `server` block in the NGINX configuration allowing it to connect to the websocket server on port `6002`.
Click on 'Sites' from the left-hand side menu, then scroll down to 'Active sites' and click on the name of the site.
 Look for the 'Files' button, click it and then click 'Edit Nginx configuration':
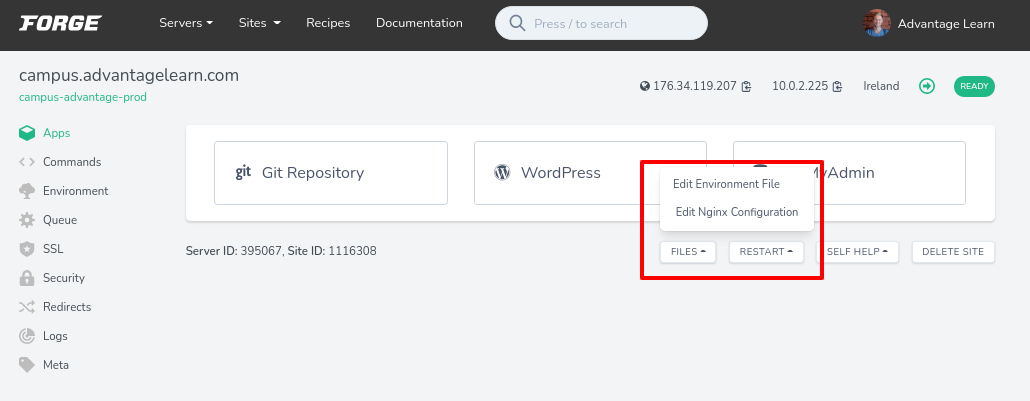 Duplicate the server block which is listening to port `443`, change all references of that port to be `6002` and then replace this block:
```bash theme={null}
location / {
try_files $uri $uri/ /index.php?$query_string;
}
```
with this:
```bash theme={null}
location / {
proxy_pass http://127.0.0.1:6001;
proxy_read_timeout 60;
proxy_connect_timeout 60;
proxy_redirect off;
# Allow the use of websockets
proxy_http_version 1.1;
proxy_set_header Upgrade $http_upgrade;
proxy_set_header Connection 'upgrade';
proxy_set_header Host $host;
proxy_cache_bypass $http_upgrade;
}
```
Hit save when done.
In full, your Nginx config will look something like this:
```bash theme={null}
# FORGE CONFIG (DO NOT REMOVE!)
include forge-conf/campus.advantagelearn.com/before/*;
server {
listen 80;
server_name campus.advantagelearn.com;
return 301 https://$host$request_uri;
}
server {
listen 443 ssl http2;
listen [::]:443 ssl http2;
server_name campus.advantagelearn.com;
server_tokens off;
root /var/www/campus.advantagelearn.com/current/public;
client_max_body_size 100M;
# FORGE SSL (DO NOT REMOVE!)
ssl_certificate /etc/nginx/ssl/campus.advantagelearn.com/877893/server.crt;
ssl_certificate_key /etc/nginx/ssl/campus.advantagelearn.com/877893/server.key;
ssl_protocols TLSv1.2;
ssl_ciphers TLS13-AES-256-GCM-SHA384:TLS13-CHACHA20-POLY1305-SHA256:TLS_AES_256_GCM_SHA384:TLS-AES-256-GCM-SHA384:TLS_CHACHA20_POLY1305_SHA256:TLS-CHACHA20-POLY1305-SHA256:ECDHE-ECDSA-AES256-GCM-SHA384:ECDHE-ECDSA-CHACHA20-POLY1305:ECDHE-ECDSA-AES256-SHA384:ECDHE-RSA-AES256-GCM-SHA384:ECDHE-RSA-CHACHA20-POLY1305:ECDHE-RSA-AES256-SHA384:ECDHE-ECDSA-AES256-SHA:ECDHE-RSA-AES256-SHA;
ssl_prefer_server_ciphers on;
ssl_dhparam /etc/nginx/dhparams.pem;
add_header X-Frame-Options "SAMEORIGIN";
add_header X-XSS-Protection "1; mode=block";
add_header X-Content-Type-Options "nosniff";
index index.html index.htm index.php;
charset utf-8;
# FORGE CONFIG (DO NOT REMOVE!)
include forge-conf/campus.advantagelearn.com/server/*;
location / {
try_files $uri $uri/ /index.php?$query_string;
}
location = /favicon.ico { access_log off; log_not_found off; }
location = /robots.txt { access_log off; log_not_found off; }
access_log off;
error_log /var/log/nginx/campus.advantagelearn.com-error.log error;
error_page 404 /index.php;
location ~ \.php$ {
fastcgi_split_path_info ^(.+\.php)(/.+)$;
fastcgi_pass unix:/var/run/php/php7.4-fpm.sock;
fastcgi_index index.php;
include fastcgi_params;
}
location ~ /\.(?!well-known).* {
deny all;
}
}
server {
listen 6002 ssl http2;
listen [::]:6002 ssl http2;
server_name campus.advantagelearn.com;
server_tokens off;
root /var/www/campus.advantagelearn.com/current/public;
# FORGE SSL (DO NOT REMOVE!)
ssl_certificate /etc/nginx/ssl/campus.advantagelearn.com/877893/server.crt;
ssl_certificate_key /etc/nginx/ssl/campus.advantagelearn.com/877893/server.key;
ssl_protocols TLSv1.2;
ssl_ciphers TLS13-AES-256-GCM-SHA384:TLS13-CHACHA20-POLY1305-SHA256:TLS_AES_256_GCM_SHA384:TLS-AES-256-GCM-SHA384:TLS_CHACHA20_POLY1305_SHA256:TLS-CHACHA20-POLY1305-SHA256:ECDHE-ECDSA-AES256-GCM-SHA384:ECDHE-ECDSA-CHACHA20-POLY1305:ECDHE-ECDSA-AES256-SHA384:ECDHE-RSA-AES256-GCM-SHA384:ECDHE-RSA-CHACHA20-POLY1305:ECDHE-RSA-AES256-SHA384:ECDHE-ECDSA-AES256-SHA:ECDHE-RSA-AES256-SHA;
ssl_prefer_server_ciphers on;
ssl_dhparam /etc/nginx/dhparams.pem;
add_header X-Frame-Options "SAMEORIGIN";
add_header X-XSS-Protection "1; mode=block";
add_header X-Content-Type-Options "nosniff";
index index.html index.htm index.php;
charset utf-8;
# FORGE CONFIG (DO NOT REMOVE!)
include forge-conf/campus.advantagelearn.com/server/*;
location / {
proxy_pass http://127.0.0.1:6001;
proxy_read_timeout 60;
proxy_connect_timeout 60;
proxy_redirect off;
# Allow the use of websockets
proxy_http_version 1.1;
proxy_set_header Upgrade $http_upgrade;
proxy_set_header Connection 'upgrade';
proxy_set_header Host $host;
proxy_cache_bypass $http_upgrade;
}
location = /favicon.ico { access_log off; log_not_found off; }
location = /robots.txt { access_log off; log_not_found off; }
access_log off;
error_log /var/log/nginx/campus.advantagelearn.com-error.log error;
error_page 404 /index.php;
location ~ \.php$ {
fastcgi_split_path_info ^(.+\.php)(/.+)$;
fastcgi_pass unix:/var/run/php/php7.4-fpm.sock;
fastcgi_index index.php;
include fastcgi_params;
}
location ~ /\.(?!well-known).* {
deny all;
}
}
# FORGE CONFIG (DO NOT REMOVE!)
include forge-conf/campus.advantagelearn.com/after/*;
```
### Step 4: Add SSL cert ENV variables
The websocket server will refuse to connect unless it has access to the Let's Encrypt certificate and key. There are two ENV variables to be added: LARAVEL\_WEBSOCKETS\_SSL\_LOCAL\_CERT and LARAVEL\_WEBSOCKETS\_SSL\_LOCAL\_PK. The path to these certs is found at `/etc/nginx/ssl/DOMAIN_NAME/SSL_CERT_ID/server.cert` and `/etc/nginx/ssl/DOMAIN_NAME/SSL_CERT_ID/server.key` respectively
[Here's a spreadsheet](https://docs.google.com/spreadsheets/d/1Pp_GgGkkgkqfQOj1_6NFEytwTl5M9DGaCxwZXgr9dkM/edit#gid=0) which has a formula for creating the env variables. All you'd need to add is the domain name and SSL cert ID, which you can get from the SSL page for each site:
Duplicate the server block which is listening to port `443`, change all references of that port to be `6002` and then replace this block:
```bash theme={null}
location / {
try_files $uri $uri/ /index.php?$query_string;
}
```
with this:
```bash theme={null}
location / {
proxy_pass http://127.0.0.1:6001;
proxy_read_timeout 60;
proxy_connect_timeout 60;
proxy_redirect off;
# Allow the use of websockets
proxy_http_version 1.1;
proxy_set_header Upgrade $http_upgrade;
proxy_set_header Connection 'upgrade';
proxy_set_header Host $host;
proxy_cache_bypass $http_upgrade;
}
```
Hit save when done.
In full, your Nginx config will look something like this:
```bash theme={null}
# FORGE CONFIG (DO NOT REMOVE!)
include forge-conf/campus.advantagelearn.com/before/*;
server {
listen 80;
server_name campus.advantagelearn.com;
return 301 https://$host$request_uri;
}
server {
listen 443 ssl http2;
listen [::]:443 ssl http2;
server_name campus.advantagelearn.com;
server_tokens off;
root /var/www/campus.advantagelearn.com/current/public;
client_max_body_size 100M;
# FORGE SSL (DO NOT REMOVE!)
ssl_certificate /etc/nginx/ssl/campus.advantagelearn.com/877893/server.crt;
ssl_certificate_key /etc/nginx/ssl/campus.advantagelearn.com/877893/server.key;
ssl_protocols TLSv1.2;
ssl_ciphers TLS13-AES-256-GCM-SHA384:TLS13-CHACHA20-POLY1305-SHA256:TLS_AES_256_GCM_SHA384:TLS-AES-256-GCM-SHA384:TLS_CHACHA20_POLY1305_SHA256:TLS-CHACHA20-POLY1305-SHA256:ECDHE-ECDSA-AES256-GCM-SHA384:ECDHE-ECDSA-CHACHA20-POLY1305:ECDHE-ECDSA-AES256-SHA384:ECDHE-RSA-AES256-GCM-SHA384:ECDHE-RSA-CHACHA20-POLY1305:ECDHE-RSA-AES256-SHA384:ECDHE-ECDSA-AES256-SHA:ECDHE-RSA-AES256-SHA;
ssl_prefer_server_ciphers on;
ssl_dhparam /etc/nginx/dhparams.pem;
add_header X-Frame-Options "SAMEORIGIN";
add_header X-XSS-Protection "1; mode=block";
add_header X-Content-Type-Options "nosniff";
index index.html index.htm index.php;
charset utf-8;
# FORGE CONFIG (DO NOT REMOVE!)
include forge-conf/campus.advantagelearn.com/server/*;
location / {
try_files $uri $uri/ /index.php?$query_string;
}
location = /favicon.ico { access_log off; log_not_found off; }
location = /robots.txt { access_log off; log_not_found off; }
access_log off;
error_log /var/log/nginx/campus.advantagelearn.com-error.log error;
error_page 404 /index.php;
location ~ \.php$ {
fastcgi_split_path_info ^(.+\.php)(/.+)$;
fastcgi_pass unix:/var/run/php/php7.4-fpm.sock;
fastcgi_index index.php;
include fastcgi_params;
}
location ~ /\.(?!well-known).* {
deny all;
}
}
server {
listen 6002 ssl http2;
listen [::]:6002 ssl http2;
server_name campus.advantagelearn.com;
server_tokens off;
root /var/www/campus.advantagelearn.com/current/public;
# FORGE SSL (DO NOT REMOVE!)
ssl_certificate /etc/nginx/ssl/campus.advantagelearn.com/877893/server.crt;
ssl_certificate_key /etc/nginx/ssl/campus.advantagelearn.com/877893/server.key;
ssl_protocols TLSv1.2;
ssl_ciphers TLS13-AES-256-GCM-SHA384:TLS13-CHACHA20-POLY1305-SHA256:TLS_AES_256_GCM_SHA384:TLS-AES-256-GCM-SHA384:TLS_CHACHA20_POLY1305_SHA256:TLS-CHACHA20-POLY1305-SHA256:ECDHE-ECDSA-AES256-GCM-SHA384:ECDHE-ECDSA-CHACHA20-POLY1305:ECDHE-ECDSA-AES256-SHA384:ECDHE-RSA-AES256-GCM-SHA384:ECDHE-RSA-CHACHA20-POLY1305:ECDHE-RSA-AES256-SHA384:ECDHE-ECDSA-AES256-SHA:ECDHE-RSA-AES256-SHA;
ssl_prefer_server_ciphers on;
ssl_dhparam /etc/nginx/dhparams.pem;
add_header X-Frame-Options "SAMEORIGIN";
add_header X-XSS-Protection "1; mode=block";
add_header X-Content-Type-Options "nosniff";
index index.html index.htm index.php;
charset utf-8;
# FORGE CONFIG (DO NOT REMOVE!)
include forge-conf/campus.advantagelearn.com/server/*;
location / {
proxy_pass http://127.0.0.1:6001;
proxy_read_timeout 60;
proxy_connect_timeout 60;
proxy_redirect off;
# Allow the use of websockets
proxy_http_version 1.1;
proxy_set_header Upgrade $http_upgrade;
proxy_set_header Connection 'upgrade';
proxy_set_header Host $host;
proxy_cache_bypass $http_upgrade;
}
location = /favicon.ico { access_log off; log_not_found off; }
location = /robots.txt { access_log off; log_not_found off; }
access_log off;
error_log /var/log/nginx/campus.advantagelearn.com-error.log error;
error_page 404 /index.php;
location ~ \.php$ {
fastcgi_split_path_info ^(.+\.php)(/.+)$;
fastcgi_pass unix:/var/run/php/php7.4-fpm.sock;
fastcgi_index index.php;
include fastcgi_params;
}
location ~ /\.(?!well-known).* {
deny all;
}
}
# FORGE CONFIG (DO NOT REMOVE!)
include forge-conf/campus.advantagelearn.com/after/*;
```
### Step 4: Add SSL cert ENV variables
The websocket server will refuse to connect unless it has access to the Let's Encrypt certificate and key. There are two ENV variables to be added: LARAVEL\_WEBSOCKETS\_SSL\_LOCAL\_CERT and LARAVEL\_WEBSOCKETS\_SSL\_LOCAL\_PK. The path to these certs is found at `/etc/nginx/ssl/DOMAIN_NAME/SSL_CERT_ID/server.cert` and `/etc/nginx/ssl/DOMAIN_NAME/SSL_CERT_ID/server.key` respectively
[Here's a spreadsheet](https://docs.google.com/spreadsheets/d/1Pp_GgGkkgkqfQOj1_6NFEytwTl5M9DGaCxwZXgr9dkM/edit#gid=0) which has a formula for creating the env variables. All you'd need to add is the domain name and SSL cert ID, which you can get from the SSL page for each site:
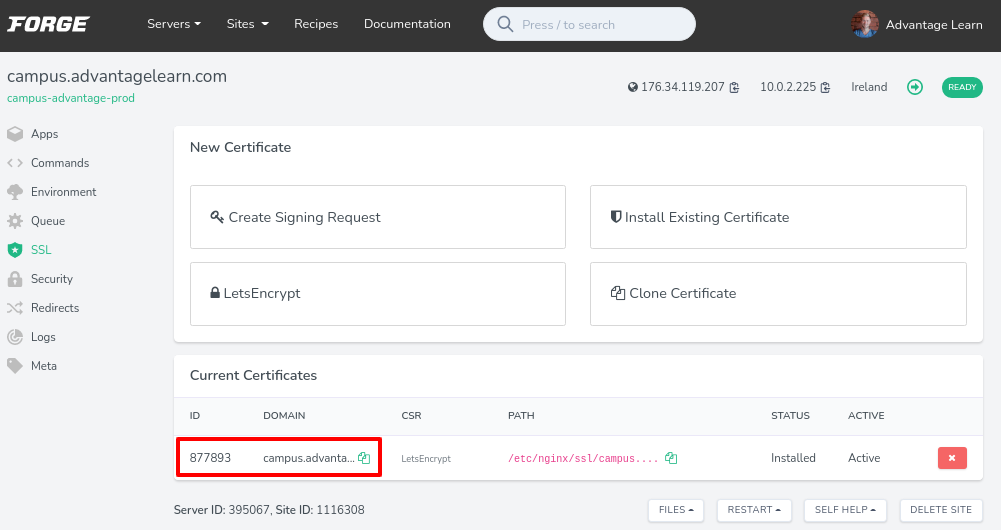 Once you have the variables, do the following:
1. Log into envoyer.io
2. Find the project for each site
3. Click on the 'Server' tab
4. Click on 'manage environment
5. Enter the server management password
6. Add the variables at the bottom of the ENV variable and save
### Troubleshooting
You can access the Laravel Websocket dashboard on any site by going to `/laravel-websockets`. Choose 6002 as the port and hit connect. If it connects, all should be fine 🎉
Once you have the variables, do the following:
1. Log into envoyer.io
2. Find the project for each site
3. Click on the 'Server' tab
4. Click on 'manage environment
5. Enter the server management password
6. Add the variables at the bottom of the ENV variable and save
### Troubleshooting
You can access the Laravel Websocket dashboard on any site by going to `/laravel-websockets`. Choose 6002 as the port and hit connect. If it connects, all should be fine 🎉
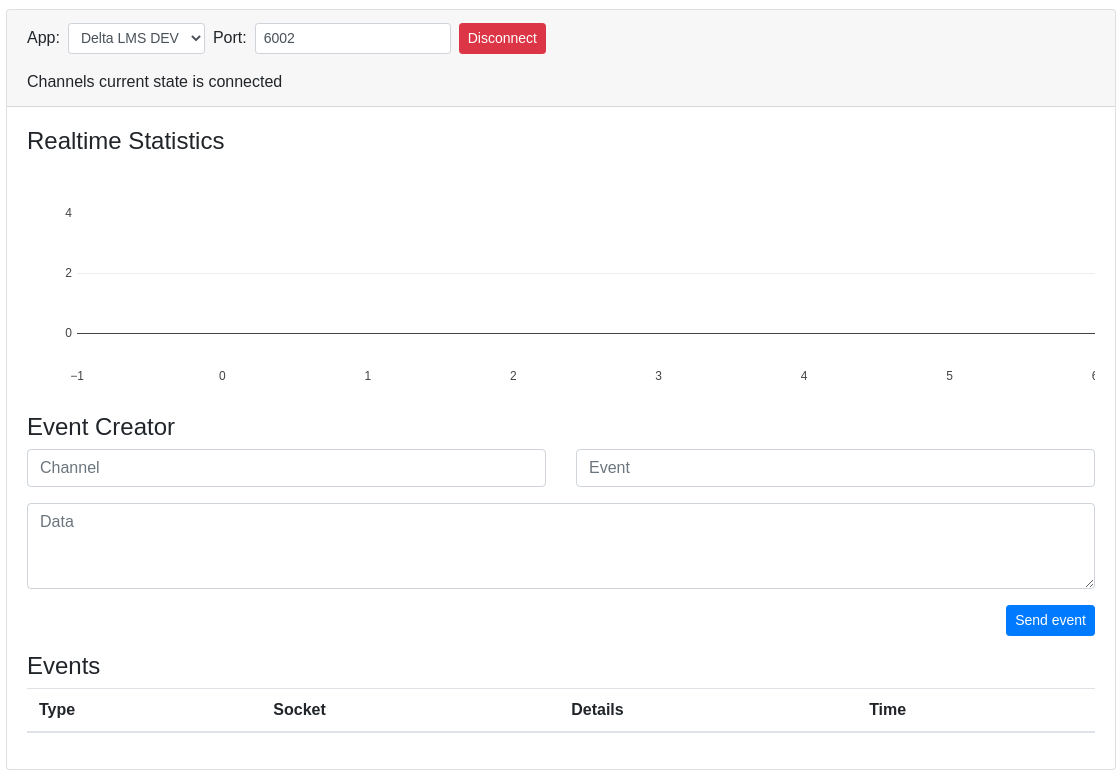 Unfortunately it won't show actual statistics as the reverse proxy from nginx messes with that process.
Laravel websockets is great in that it allows us access to realtime data without cost, but it is extremely finnicky and not well documented. If it breaks, you won't really have any indication as to why. Nevertheless, [here is the troubleshooting page](https://beyondco.de/docs/laravel-websockets/getting-started/questions-issues). If that doesn't help, good luck going down the stack overflow rabbit hole!
Unfortunately it won't show actual statistics as the reverse proxy from nginx messes with that process.
Laravel websockets is great in that it allows us access to realtime data without cost, but it is extremely finnicky and not well documented. If it breaks, you won't really have any indication as to why. Nevertheless, [here is the troubleshooting page](https://beyondco.de/docs/laravel-websockets/getting-started/questions-issues). If that doesn't help, good luck going down the stack overflow rabbit hole!